Imagine effortlessly smooth skin without the hassle of regular waxing or shaving. It sounds almost too good to be true, doesn’t it? Thanks to the magic of at-home laser hair removal devices, this dream has become a reality for many. These sleek gadgets promise salon-quality results from the comfort of your own bathroom. But before you embark on what seems like a modern-day miracle, it’s crucial to shed light on the hidden shadows lurking behind those enticing promises. Welcome to the dark side of at-home laser hair removal—a side often glossed over by glossy advertisements and glowing testimonials. Let’s dive in with a friend’s honesty and explore what you really need to know before picking up that laser.
Table of Contents
- Risk of Skin Burns and Irritations
- Understanding Laser Settings: Avoiding the Heat
- Proper Pre-Treatment Steps: Prepping Your Skin
- Post-Treatment Care: Soothe and Protect
- Choosing the Right Device: What to Look For
- Q&A
- In Summary

Risk of Skin Burns and Irritations
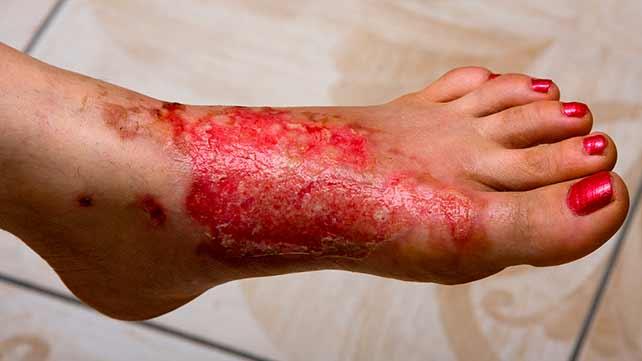
One significant concern when using at-home laser hair removal devices is **the risk of skin burns**. These devices emit powerful beams of light that target hair follicles, and incorrect usage or too high a setting can lead to serious skin damage. Burns may range from minor discomfort to severe blistering, leaving long-lasting scars. Factors such as skin type, hair color, and device quality all play a role in making this a high-stakes beauty procedure right from your bathroom. Remember, a desire for smooth skin shouldn’t come with a side of first-degree burns.
Another common issue faced by DIY laser hair removal enthusiasts is **skin irritation**. Redness, swelling, and itching can occur if the skin is sensitive or if the area being treated has not been properly prepped. For many, this irritation is an annoying side effect that can turn into a painful ordeal. Consider conducting a patch test on a small area of your skin to see how it reacts to the laser. This preliminary step can save you from widespread irritation that could last for days or even weeks.
There are several tips to **minimize skin irritation and burns**:
- Hair Removal Timing: Avoid sun exposure for at least two weeks before and after treatment.
- Skin Hydration: Keep your skin well-moisturized with a fragrance-free lotion.
- Device Settings: Always start with the lowest intensity setting and adjust accordingly.
Understanding which skin types and areas are more susceptible to burns and irritations can be incredibly useful:
| Skin Type | Risk Level |
|---|---|
| Fair Skin | Low |
| Medium Skin | Moderate |
| Dark Skin | High |
By being aware of these risks and taking the necessary precautions, you can avoid the painful consequences of at-home laser hair removal. Taking the time to understand your skin and react accordingly ensures that your journey to hair-free skin doesn’t leave a trail of painful memories.

Understanding Laser Settings: Avoiding the Heat
Getting the right laser settings is crucial to avoid overheating your skin and causing unwanted damage. While the idea of smoother, hair-free skin might be appealing, the reality of burns and hyperpigmentation is far less attractive. Ensuring your at-home laser device is set correctly can make all the difference.
- Select the Right Intensity: Start with the lowest intensity setting. Too high a setting right out of the gate can lead to painful burns.
- Spot Testing: Always perform a patch test before treating a larger area. This helps you gauge your skin’s reaction to the laser.
- Cooling Mechanisms: Some devices offer built-in cooling systems. Opt for these if you’re particularly sensitive to heat.
Incorrect laser settings not only lead to burns but can also prompt other skin issues like discoloration. Melanin absorbs the laser’s energy, and settings that are too high can cause this pigment to overreact. To help you manage, here’s what to expect with varying skin tones:
| Skin Tone | Recommended Setting | Precautions |
|---|---|---|
| Fair | Low to Medium | Monitor closely for redness |
| Medium | Low to Medium | Test small areas first |
| Dark | Low | Use cooling gel pre-treatment |
Mistaking higher settings for quicker results is a common error. It’s more effective to use the appropriate settings consistently over a series of sessions. Commitment to a schedule and fine-tuning the settings based on feedback from your skin can ensure that you achieve optimal results without the adverse side effects.
If you’re unsure, it’s always wise to consult with a dermatologist to get a better understanding of how your skin might react. They can also provide guidance on the best device and settings for your skin type, helping you navigate the complexities of at-home laser hair removal more safely and effectively.
Proper Pre-Treatment Steps: Prepping Your Skin
Getting ready for your at-home laser hair removal session isn’t just about turning on the device and zapping away. To achieve the best results and minimize risks, you need to carefully prepare your skin. One of the key steps involves thoroughly cleansing the treatment area. Use a gentle, fragrance-free cleanser to wash away any oils, makeup, or lotions. Ensuring your skin is clean will help the laser penetrate the hair follicle more effectively.
Next, shaving the area you’re planning to treat is crucial. **Avoid waxing or plucking**, as the laser needs to target the pigment in the hair follicle. Shaving leaves the hair shaft intact while removing the hair above the skin, allowing the laser to reach its target. Make sure to shave within 24 hours of your treatment, and always use a sharp, clean razor to avoid irritating your skin.
Before you dive in, it’s important to conduct a patch test. This step helps to identify any potential skin reactions and determines the laser settings that are safe for your skin type. Apply the laser on a small, inconspicuous area, and wait at least 24 hours to see how your skin responds. If you experience excessive redness, blistering, or any other adverse reaction, reconsider your device settings or seek professional advice.
Lastly, avoid sun exposure as much as possible leading up to your session. Sunburned or tanned skin can lead to increased sensitivity or, worse, burns and hyperpigmentation. **Opt for loose, breathable clothing** to cover treated areas if you must go outside. To help you remember these key steps, here’s a quick reference table with some helpful tips:
| Step | Tip |
|---|---|
| Cleansing | Use a gentle, fragrance-free cleanser |
| Shaving | Shave within 24 hours of treatment |
| Patch Test | Wait at least 24 hours for reactions |
| Sun Avoidance | Wear loose, protective clothing |

Post-Treatment Care: Soothe and Protect
After using an at-home laser hair removal device, it’s crucial to focus on soothing your skin and protecting it from further irritation. Immediately following your session, your skin might feel tender and appear slightly red. To calm the inflammation, consider using products that have calming ingredients such as aloe vera or chamomile. These natural elements are known for their soothing properties and can help reduce redness and discomfort.
Post-treatment care should also involve staying away from direct sunlight. Your skin becomes more sensitive post-laser treatment, so applying sunscreen with an SPF of at least 30 is essential. **Furthermore, make sure to wear loose, breathable clothing** to avoid further irritation. Tight clothes can rub against the treated areas, potentially causing friction and discomfort.
Do’s:
- Apply a cold compress to the treated area if you experience stinging or discomfort.
- Moisturize your skin regularly to keep it hydrated.
- Use gentle, unscented lotions to avoid irritation.
Don’ts:
- Avoid hot showers, saunas, and steam rooms for at least 24 hours post-treatment.
- Do not exfoliate the skin in the treated area for a few days.
- Stay away from tanning beds and direct sun exposure.
| Recommended Products | Why We Love Them |
|---|---|
| Aloe Vera Gel | Natural, soothing, and perfect for post-laser treatment care. |
| Broad Spectrum Sunscreen (SPF 30+) | Protects sensitive skin from harmful UV rays. |
| Chamomile Lotion | Calming and reduces redness and irritation. |

Choosing the Right Device: What to Look For
Choosing a device for at-home laser hair removal can be daunting, especially with a plethora of options on the market. To make this process a bit easier, here are some crucial factors to keep in mind:
Skin Tone Compatibility: Certain devices are designed to work only on specific skin tones and hair colors. Make sure the device you choose can handle your unique combination. Check if the laser emits the right wavelength for your skin – some at-home devices come equipped with skin tone sensors to help with this.
Usage Flexibility: Pay attention to the device’s ergonomic design and whether it can easily access hard-to-reach body areas. Devices with multiple attachments for large and small sections of the body can provide a more thorough and versatile hair removal experience.
Here’s a short comparison table to help streamline your decision:
| Feature | Device A | Device B |
|---|---|---|
| Skin Tone Compatibility | Fair to Medium | All Skin Tones |
| Attachments Included | 2 | 4 |
| Price | $$ | $$$ |
Safety Features: This is non-negotiable. Look for devices that include multiple safety features such as skin sensor technology and adjustable power settings. A good device will only emit pulses when placed against skin, reducing the risk of accidental exposure to eyes.
Customer Reviews: Nothing beats real-world feedback. **Check customer reviews** and ratings across different platforms before making a decision. Real-life experiences can shed light on practical aspects that spec sheets might overlook, such as ease of use, effectiveness over time, and device longevity.
Q&A
The Dark Side of At-Home Laser Hair Removal: A Friendly Q&A
Q: Hey there! I’ve been hearing a lot about at-home laser hair removal. Is it as amazing as everyone says?
A: Hey! Great question. While at-home laser hair removal can be quite convenient and cost-effective, it’s important to be aware of the potential downsides. Let’s shine some light on the darker side of this beauty trend!
Q: Uh-oh, dark side? That sounds ominous. What’s the catch?
A: Don’t worry, I’m not trying to scare you! But yes, there are some things you should consider. For starters, the risks of improper use. These devices aren’t always foolproof and, without the right knowledge, you could end up with burns, scars, or skin discoloration. Yikes!
Q: Burns?! That sounds painful! Why does this happen?
A: Absolutely, nobody wants that. Burns usually occur when the laser’s intensity is too high for your skin type or when it’s used incorrectly. Always follow the manufacturer’s instructions to a tee and do a patch test on a small part of your skin before going full throttle. Safety first!
Q: Got it, patch test! Is there anything else that can go wrong?
A: Glad you asked! Another issue is skin irritation. Even when used correctly, some users experience redness or swelling post-treatment. This is usually temporary, but it’s a good idea to have some soothing aloe vera gel handy just in case.
Q: Phew! Temporary sounds manageable. Can all skin tones use these devices?
A: That’s a fantastic point. Most at-home laser devices work best on light to medium skin tones with dark hair. If you have darker skin or very light hair, the laser may not be as effective and could even cause hyperpigmentation. Always check if the device is compatible with your skin tone and hair color before purchasing.
Q: Wow, I never knew that! How about costs? Are these gadgets worth the investment?
A: They can be a good investment for many, but remember, the initial cost can be quite hefty. Plus, they might not offer results as quickly or as effectively as professional treatments. You’ll need to be patient and consistent with your sessions to see a noticeable difference.
Q: Consistency is key, got it. Any other hidden downsides?
A: Let’s not forget the maintenance. These devices often need regular cleaning and, eventually, replacement parts. It’s also worth mentioning that if you have underlying skin conditions, at-home lasers might not be suitable. To be on the safe side, always consult with a dermatologist before starting any new laser treatments.
Q: Whew, that’s a lot to consider! So, should I just skip at-home laser hair removal altogether?
A: Not necessarily! It can definitely work well for some, especially if you’re someone who’s comfortable with a little DIY. Just make sure you do your research, choose a reputable brand, and read the instructions carefully. Knowledge is power, after all! With the right precautions, you can avoid most of the pitfalls we discussed.
Q: Thanks for all the tips! I feel way more informed now.
A: No problem at all! Remember, achieving smooth, hair-free skin is totally possible, but it’s always good to proceed with caution. Happy hair zapping!
In Summary
As we close the curtain on this illuminating exploration of the dark side of at-home laser hair removal, we hope the beams of truth have guided your path toward informed decisions. While the allure of silky, smooth skin can be compelling, it’s clear that every rose has its thorns—or in this case, every laser has its potential pitfalls.
Remember, your skin is a canvas that tells your unique story. Treat it with the care and respect it deserves. Whether you choose to go the DIY route or seek professional help, let your choices reflect a commitment to health and well-being.
Thanks for joining us on this journey. Here’s to navigating the world of beauty with wisdom and grace, one hair follicle at a time. Until next time, stay curious and stay radiant! 


